Tutorial 5 - Taking it mobile: Android
Now, we\'re going to take our application, and deploy it as an Android application.
The process of deploying an application to Android is very similar to the process for deploying as a desktop application. Briefcase handles installing dependencies for Android, including the Android SDK, the Android emulator, and a Java compiler.
Create an Android app and compile it
First, run the create command. This downloads an Android app template
and adds your Python code to it.
:::::: {.tabs} ::: {.group-tab} macOS
(beeware-venv) $ briefcase create android

[helloworld] Generating application template...
Using app template: https://github.com/beeware/briefcase-android-gradle-template.git, branch v0.3.18
...

[helloworld] Installing support package...
No support package required.

[helloworld] Installing application code...
Installing src/helloworld... done

[helloworld] Installing requirements...
Writing requirements file... done

[helloworld] Installing application resources...
...

[helloworld] Removing unneeded app content...
Removing unneeded app bundle content... done

[helloworld] Created build/helloworld/android/gradle
::: {.group-tab} Linux
(beeware-venv) $ briefcase create android

[helloworld] Generating application template...
Using app template: https://github.com/beeware/briefcase-android-gradle-template.git, branch v0.3.18
...

[helloworld] Installing support package...
No support package required.

[helloworld] Installing application code...
Installing src/helloworld... done

[helloworld] Installing requirements...
Writing requirements file... done

[helloworld] Installing application resources...
...

[helloworld] Removing unneeded app content...
Removing unneeded app bundle content... done

[helloworld] Created build/helloworld/android/gradle
::: {.group-tab} Windows
(beeware-venv) C:\...>briefcase create android

[helloworld] Generating application template...
Using app template: https://github.com/beeware/briefcase-android-gradle-template.git, branch v0.3.18
...

[helloworld] Installing support package...
No support package required.

[helloworld] Installing application code...
Installing src/helloworld... done

[helloworld] Installing requirements...
Writing requirements file... done

[helloworld] Installing application resources...
...

[helloworld] Removing unneeded app content...
Removing unneeded app bundle content... done

[helloworld] Created build\helloworld\android\gradle
When you run briefcase create android for the first time, Briefcase
downloads a Java JDK, and the Android SDK. File sizes and download times
can be considerable; this may take a while (10 minutes or longer,
depending on the speed of your Internet connection). When the download
has completed, you will be prompted to accept Google\'s Android SDK
license. There\'s a number of licenses you\'ll need to agree too - keep
entering y at the prompt to review and accept each of the necessary
the license agreements.
Once this completes, we\'ll have a build\helloworld\android\gradle
directory in our project, which will contain an Android project with a
Gradle build configuration. This project will contain your application
code, and a support package containing the Python interpreter.
We can then use Briefcase\'s build command to compile this into an
Android APK app file.
:::::: {.tabs} ::: {.group-tab} macOS
(beeware-venv) $ briefcase build android

[helloworld] Updating app metadata...
Setting main module... done

[helloworld] Building Android APK...
Starting a Gradle Daemon
...
BUILD SUCCESSFUL in 1m 1s
28 actionable tasks: 17 executed, 11 up-to-date
Building... done

[helloworld] Built build/helloworld/android/gradle/app/build/outputs/apk/debug/app-debug.apk
::: {.group-tab} Linux
(beeware-venv) $ briefcase build android

[helloworld] Updating app metadata...
Setting main module... done

[helloworld] Building Android APK...
Starting a Gradle Daemon
...
BUILD SUCCESSFUL in 1m 1s
28 actionable tasks: 17 executed, 11 up-to-date
Building... done

[helloworld] Built build/helloworld/android/gradle/app/build/outputs/apk/debug/app-debug.apk
::: {.group-tab} Windows
(beeware-venv) C:\...>briefcase build android

[helloworld] Updating app metadata...
Setting main module... done

[helloworld] Building Android APK...
Starting a Gradle Daemon
...
BUILD SUCCESSFUL in 1m 1s
28 actionable tasks: 17 executed, 11 up-to-date
Building... done

[helloworld] Built build\helloworld\android\gradle\app\build\outputs\apk\debug\app-debug.apk
::: {.admonition} Gradle may look stuck
During the briefcase build android step, Gradle (the Android platform
build tool) will print CONFIGURING: 100%, and appear to be doing
nothing. Don\'t worry, it\'s not stuck - it\'s downloading more Android
SDK components. Depending on your Internet connection speed, this may
take another 10 minutes (or longer). This lag should only happen the
very first time you run build; the tools are cached, and on your next
build, the cached versions will be used.
:::
Run the app on a virtual device
We\'re now ready to run our application. You can use Briefcase\'s run
command to run the app on an Android device. Let\'s start by running on
an Android emulator.
To run your application, run briefcase run android. When you do this,
you\'ll be prompted with a list of devices that you could run the app
on. The last item will always be an option to create a new Android
emulator.
:::::: {.tabs} ::: {.group-tab} macOS
:::::: {.group-tab} Linux
:::::: {.group-tab} Windows
::: ::::::We can now choose our desired device. Select the \"Create a new Android
emulator\" option, and accept the default choice for the device name
(beePhone).
Briefcase run will automatically boot the virtual device. When the
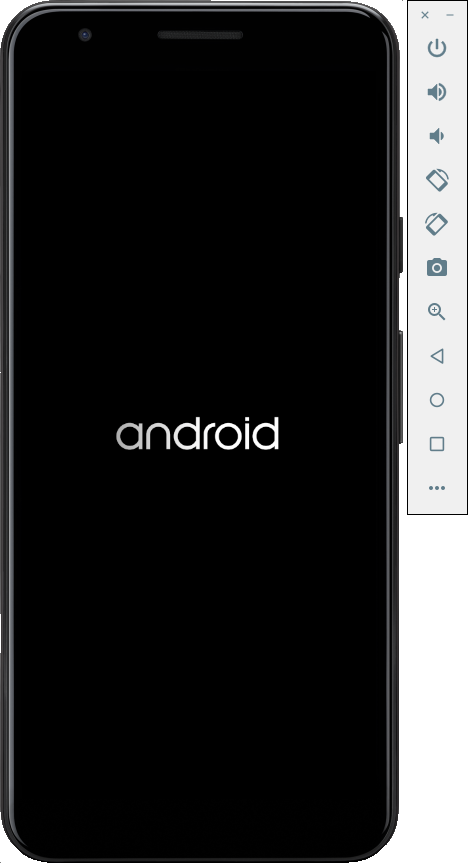
device is booting, you will see the Android logo:
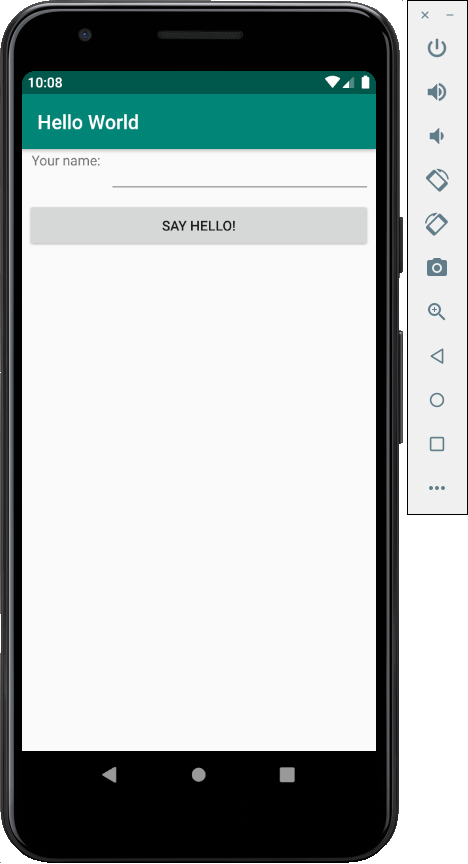
Once the device has finished booting, Briefcase will install your app on the device. You will briefly see a launcher screen:
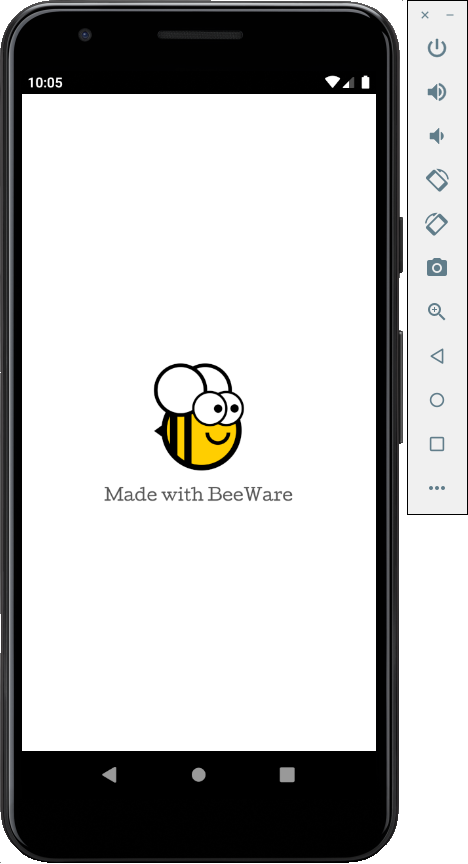
The app will then start. You\'ll see a splash screen while the app starts up:
::: {.admonition} The emulator didn\'t start!
The Android emulator is a complex piece of software that relies on a number of hardware and operating system features - features that may not be available or enabled on older machines. If you experience any difficulties starting the Android emulator, consult the Requirements and recommendations section of the Android developer documentation. :::
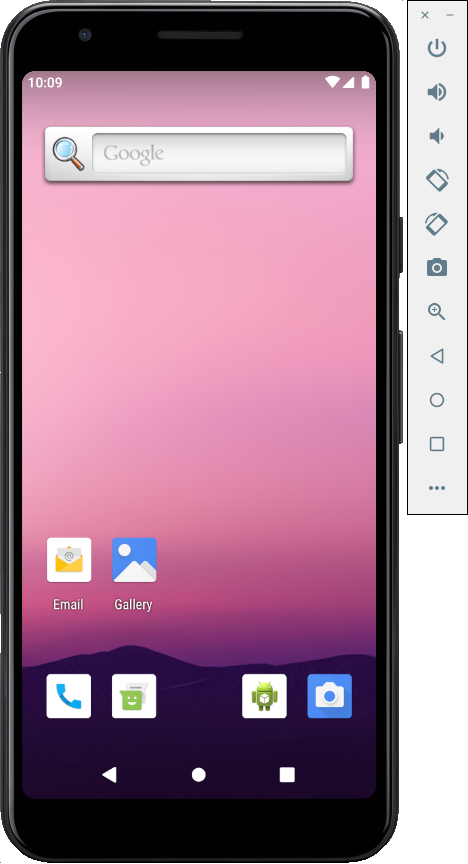
The first time the app starts, it needs to unpack itself onto the device. This may take a few seconds. Once it\'s unpacked, you\'ll see the Android version of our desktop app:
If you fail to see your app launching, you may need to check your
terminal where you ran briefcase run and look for any error messages.
While the app is running, you\'ll see a lot of messages being streamed in the console. This is a stream of the application\'s logs from the emulator. Typing Ctrl+C into the terminal will halt the streamed information in the console, but it will not close the emulator. This is so you can test new changes without restarting the emulator.
In future, if you want to run on this device without using the menu, you
can provide the emulator\'s name to Briefcase, using
briefcase run android -d "@beePhone" to run on the virtual device
directly.
Run the app on a physical device
If you have a physical Android phone or tablet, you can connect it to your computer with a USB cable, and then use the Briefcase to target your physical device.
Android requires that you prepare your device before it can be used for development. You will need to make 2 changes to the options on your device:
- Enable developer options
- Enable USB debugging
Details on how to make these changes can be found in the Android developer documentation.
Once these steps have been completed, your device should appear in the
list of available devices when you run briefcase run android.
:::::: {.tabs} ::: {.group-tab} macOS
(beeware-venv) $ briefcase run android

Select device:

  1) Pixel 3a (94ZZY0LNE8)
  2) @beePhone (emulator)
  3) Create a new Android emulator

>
::: {.group-tab} Linux
(beeware-venv) $ briefcase run android

Select device:

  1) Pixel 3a (94ZZY0LNE8)
  2) @beePhone (emulator)
  3) Create a new Android emulator

>
::: {.group-tab} Windows
(beeware-venv) C:\...>briefcase run android

Select device:

  1) Pixel 3a (94ZZY0LNE8)
  2) @beePhone (emulator)
  3) Create a new Android emulator

>
Here we can see a new physical device with it\'s serial number on the
deployment list - in this case, a Pixel 3a. In the future, if you want
to run on this device without using the menu, you can provide the
phone\'s serial number to Briefcase (in this case,
briefcase run android -d 94ZZY0LNE8). This will run on the device
directly, without prompting.
::: {.admonition} My device doesn\'t appear!
If your device doesn\'t appear on this list at all, either you haven\'t enabled USB debugging, (or the device isn\'t plugged in!).
If your device appears, but is listed as \"Unknown device (not
authorized for development)\", developer mode hasn\'t been correctly
enabled. Re-run the steps to enable developer
options,
and re-run briefcase run android.
:::
Next steps
We\'ve now got an application on our phone! Is there anywhere else we
can deploy a BeeWare app? Turn to
Tutorial 6 <../../tutorial-6> to find
out...